Ergonomics
What is Ergonomics?
According to Merriam-Webster, ergonomics is “an applied science concerned with designing and arranging things people use so that the people and things interact most efficiently and safely.” Below we’ve included some tips to help you set up your workstation to optimize health and well-being.
“There is no single “correct” posture or arrangement of components that will fit everyone. However, there are basic design goals.” – OSHA (Occupational Safety and Health Administration)
4 Steps to Set Up Your Computer Workstation
Properly arranging the various components of your workstation will help you perform more efficiently while working more comfortably and safely. Whether you are a new employee or at a new workstation, follow these 4 steps to help setup your computer workstation.
Step 1: Chair
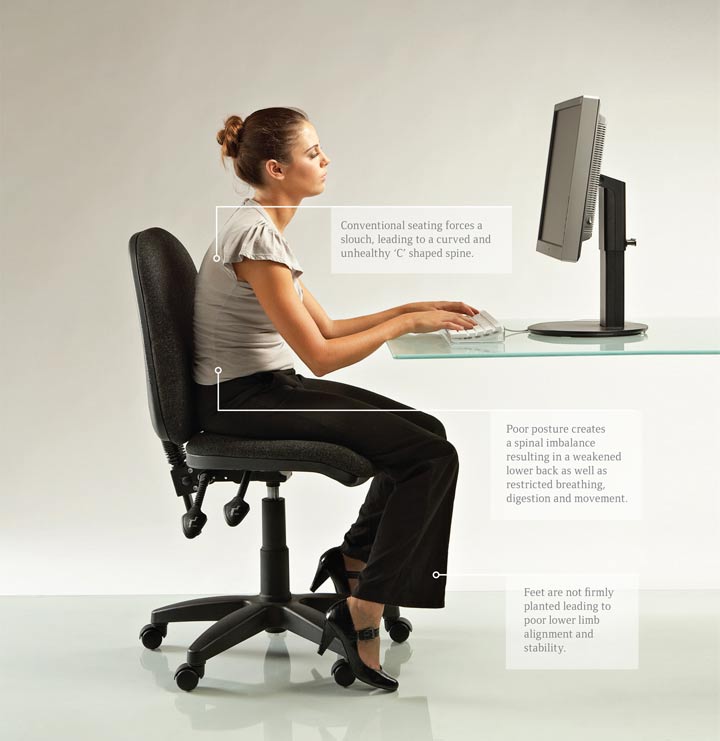 A well-designed and appropriately adjusted chair provides the necessary support for the body by reducing exposures to awkward postures and contact stress. Follow the steps below to learn how to properly setup and sit at your workstation:
- Push your hips as far back as they can go in the chair.
- Sit up straight allowing the natural curve of your spine to form to the lumbar support of the chair to alleviate pressure and stress on the low back.
- Adjust the chair height so your feet are flat on the floor and your knees are equal to, or slightly lower than, your hips.
- Adjust the back of the chair to a 100°-110° reclined angle. Make sure your upper and lower back are supported (use small pillows if needed).
- Adjust the armrests so that your shoulders are relaxed. If your armrests are in the way, remove them.
Step 2: Keyboard
 You should choose a keyboard and consider its placement relative to other components of your workstation including the computer monitor, mouse, and telephone. An articulating keyboard tray can be used to provide leg clearance and have an adjustable height and tilt mechanism. Follow the steps below for proper keyboard positioning:
- Pull up close to your keyboard.
- Position the keyboard directly in front of your body – you should not have to bend or twist your wrist.
- Determine what section of the keyboard you use most frequently, and readjust the keyboard so that section is centered with your body to maintain good posture
- Adjust the keyboard height so that your shoulders are relaxed, your elbows are in a slightly open position (100° to 110°), and your wrists and hands are straight.
- Use the keyboard tray mechanism, or keyboard feet, to adjust the tilt. If you sit in a forward or upright position, try tilting your keyboard away from you at a negative angle. If you are reclined, a slight positive tilt will help maintain a straight wrist position.
- Palm support can help to maintain neutral postures and pad hard surfaces. However, the palm support should only be used to rest the palms of the hands between keystrokes. Resting on the palm support while typing is not recommended. Avoid using excessively wide palm support, or palm support that is higher than the space bar of your keyboard.
- Place the mouse as close as possible to the keyboard. Placing it on a slightly inclined surface can help to bring it closer.
- If you do not have a fully adjustable keyboard tray, you may need to adjust your workstation height, the height of your chair, or use a seat cushion to get in a comfortable position. Remember to use a footrest if your feet dangle.
Step 3: Monitor, Documents, and Telephone
 Incorrect positioning of the screen and source documents can result in awkward postures. Adjust the monitor and source documents so that your neck is in a neutral and relaxed position.
- Center the monitor directly in front of you above your keyboard so your head, neck and torso face forward when viewing the screen.
- The center of the monitor should normally be located 15-20 degrees below horizontal eye level. (If you wear bifocals, lower the monitor to a comfortable reading level or raise your chair height to reduce neck fatigue.)
- Sit at least an arm’s length away from the screen and then adjust the distance for your vision.
- Place monitor at right angles to windows or adjust curtains/blinds to reduce glare.
- Position documents directly in front of you, between the monitor and the keyboard. If there is insufficient space, place source documents on a document holder positioned adjacent to the monitor.
- Place your telephone within easy reach. Telephone stands or arms can help (Use a headset or speaker phone to eliminate cradling the handset).
Step 4: Pauses and Breaks
 Once your computer workstation is properly set up, be sure to use good work habits and rest periodically. Prolonged, static postures will inhibit blood circulation and become tiring on your body.
- Stand up from your workstation and take short 1-2 minute stretch breaks every 20-30 minutes. After each hour of work, take a break or change tasks for at least 5-10 minutes. Always try to get away from your computer during lunch breaks.
- Rest your eyes by covering them with your palms for 10-15 seconds.
- Avoid eye fatigue by resting and refocusing your eyes periodically. Look away from the monitor and focus on something in the distance.
- If possible, alternate duties with other non-computer tasks to provide periods of rest for your eyes and back.